Last Updated on
Different types of vegetables can do well in raised garden beds. Most raised garden beds have fertile soil, which nourishes vegetables, giving you superb results. Not to mention, raised bed gardening can help you get healthy plants and vegetables. Planting different types of vegetables in raised vegetable beds is an easy task.
Since a raised garden bed is elevated, it is quite easy to maintain it and keep it clean. For instance, dirty water and rainwater cannot drain into it, leaving you with more control over the care of your plants.
However, if you want to spruce up your garden but don’t like the look of the garden bed available for purchase online, you are in the right place. In this post, we will show you how to build a raised garden bed from scratch.
Different Materials That Can Build Garden Beds
Whether you are planning to construct a raised vegetable bed or a flower bed on loose soil, you can build raised beds using various materials. Examples of such materials include scaffolding planks, concrete, tree logs, bricks, wood sleepers, and natural stone.
Apart from that, natural hardwood and pressure-treated wood are suitable for constructing planters. However, every material that is used in the construction of raised beds has its pros and cons. For instance, natural hardwood is quite durable and can hold various vegetables for a long time without getting damaged. However, it has a high density, which might give you a hard time while you are erecting a raised bed.
On the other hand, treated wood is quite cost-effective. However, it might not last for a long period like natural hardwood.
Step By Step Guide to Building Raised Beds
Raised flower beds and vegetable beds can be erected in your garden or backyard during the winter season, giving you enough time to prepare the bed for sowing. However, the soil you are working on should have a low moisture content to avoid it from sinking.
Moreover, if the soil doesn’t have suitable conditions, raised beds can be erected on the ground during the late summer period.
Step 1: Determine the Area and Location That You Want to Build the Bed
Start off by determining the spot or area where you are planning to install the raised bed on. You should install the raised bed on a spot that can be easily accessed from different parts of the garden. Also, look at how big your bed will be and how much space you will need.
If you are planning on planting various garden plants in the raised bed, you should install the bed in a well-lit place.
Step 2: Level the Topsoil Surface
A raised garden bed should rest on a flat and even surface so that it won’t topple.
Once you determine the spot where you are going to install the wood frame, you have to check if the entire area is flat enough to hold the raised bed.
A spirit level and a wooden plank might be ideal for you if you are planning to check the level of the ground.
If you do not have a spirit level, you can use wooden sleepers to determine if a surface is flat and adjust the side that has an uneven elevation.
Remove any items that are in the way, such as rocks, plants, and any litter; you need the ground to be clear for the best results.
Step 3: Determine the Type of Wooden Sleepers That You Are Going to Use
Next, determine the wooden sleepers that you are going to use to create the wooden raised bed. New wooden sleepers are more effective in building raised planters than other types of planks.
Such wooden sleepers offer you a lot of woodworking styling options, which can blend perfectly with wooden fences, walls, and other structures.
On the contrary, reused wood sleepers can also be used to create the outer frame of the raised bed. However, reused wooden sleepers might be more vulnerable to timber defects than new wooden sleepers, putting your raised bed plants at risk.
Step 4: Place the Wooden Sleepers Where You Are Planning to Build the Bed
Check if the sleepers have been cut to match the dimensions of the raised bed. If the sleepers are big, maybe twice the size the length, cut them to get two equal parts. One half can be used to construct one side.
Place two wooden sleepers on the spot where you plan to build a raised bed to act as the sidewalls, starting with the long wooden sleeper. Next, place the short timber sleeper on the surface. The ends of those two wooden sleepers should join perfectly to form a 90 degrees angle.
Once you join the two ends, you have to drive the wood screws into the 90 degrees joint to secure the joint.
Afterwards, place two other sleepers on the base to complete the rectangular shape; the ends of the walls should come into contact at a 90 degrees angle, also.
After that, secure the two sleepers to the other sleepers at the 90-degree joints.
To get effective results, build another layer to increase the total height. While 20cm is the minimum height that every planter should have, taller planters are more effective in keeping various plants healthy. Once you finish assembling the base layer, building another one using timber sleepers will be quite easy. You just have to stack more sleepers on top of the base layer, following the outline of the base layer.
Drive in wooden screws in the 90° corners to secure the timber sleepers in one position, improving the sturdiness of the raised bed.
Step 5: Place a Polythene Paper or Any Other Plastic Sheet in the Raised Planter
If you want to separate the bed from the ground, place a weed barrier on the base to keep weed plants from growing in the raised bed. Landscape fabric is quite effective in maintaining the ecosystem of the raised garden bed. Most gardeners use such fabrics to minimize the growth of weed plants on the garden bed, keeping other plants healthy.
In some instances, the timber sleepers might come with a strong wood preservative, which might be harmful to your plants or soil. To minimize the effects of such treatments, you may also have to cover the inner parts of the raised bed with a plastic sheet. You can also use the plastic sheet on untreated wood.
Step 6: Pour Fertile Soil/Topsoil Into the Raised Planter
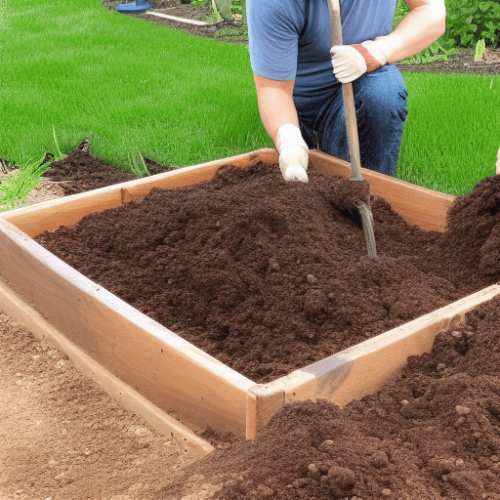
Start off by pouring some coarse sand or cobblestones into the raised garden bed base until the granules/stones fill the empty space to a certain height. Such stones offer you an improved drainage system. Next, determine how much soil/topsoil you are going to use, depending on the vegetables you are planning to plant in the bed.
After that, pour the fresh, fertile soil into the raised garden bed to accommodate different plants. Organic matter or rotted compost might also nourish the plants that you are planning to grow. For example, a mixture of different manure makes it easier for you to grow healthy plants in a raised bed.
Compost can be poured into the raised bed during the fall to get superb results. Nutrients from the compost will dissolve into the topsoil of the raised bed and nourish plants.
Furthermore, the soil depth should be compatible with the plants that you are planning to grow. For instance, if you want to grow different types of root vegetables, the raised bed should have a soil depth of about 55cm to 70cm. Such plants produce superb results in deep soil. Also, if the garden bed rests on a very hard surface, you have to increase the soil depth. Once the soil is deep, the roots of different plants won’t come into contact with the hard surface.
Hard surfaces like concrete might affect the growth of the vegetables that you are planting in your DIY raised garden bed.
Build a Planter in Your Garden
Clearly, building a planter is a simple DIY task that can be accomplished easily. Make sure that you lay the wood frames on a stable and flat surface to get superb results. Once you finish building the wooden planter, fill up the empty space using cobblestones, manure, and topsoil. This makes it easier for you to do some high-quality gardening on the planter during the spring season.
Ian loves everything that revolves around the home improvement niche. He loves trying out new home appliances. He has also handled a lot of equipment and has a lot of insight. Plus, he’s worked on various home improvement projects that became a success.
If Ian isn’t busy working on his latest project, you can find him reading up about another one!