Last Updated on
A hose reel is a useful garden tool for keeping your hose within easy reach when it’s time to water your plants. Often, a bought garden hose reel can be expensive, which is why we have some exciting designs with which you can create your own hose storage and save some money.
Your DIY Guide to Making Garden Hose Reels
So, if you need some inspiration in learning how to make a garden hose reel, we have three options for you. Both seasoned and new gardeners can benefit from these DIY hose reel ideas because they are useful and don’t necessarily require expert woodworking abilities.
PVC Hose Reel
Use PVC pipe fittings to construct a cheap, simple, solid, and long-lasting DIY garden hose reel. These materials are ideal for gardens that surround your home, and you need the convenience of wheeling your garden hose around your lawn. Additionally, a PVC garden hose reel can be beneficial for fewer restrictions.
Step 1: Cut the Pipe
Use a tape measure to cut the exact PVC pipe measurements that you need.
Step 2: Create a Frame
Next, you’ll need a frame that can hold the hose in place and make it easy to wrap around your DIY project when not in use. Begin with the base to connect an elbow piece to a cap with a 20-inch pipe for the frame. Then, attach an 11-inch pipe section to the other side of the elbow, pointing downwards to keep the hose reel securely on the ground. Repeat this on the other side for two completed frames.
You’ll then need to install the body for a completed garden hose reel. Attach a 9-inch pipe around 1/3 of the way down on the 11-inch pipe so that you can connect both 11-inch pipes. Repeat this around 2/3 of the way to securely attach both legs.
By the end of this, both of your frames will be connected in two spots.
Step 3: Create the Water Hose Rack
Once you have a solid frame, it’s time to create a water hose rack to wrap your hose around. To do this, insert a 14.5inch PVC pipe section into the bottom tee and add a 45-degree elbow on the other end. Complete this with a 9-inch section that points upwards.
Step 4: Glue the Pieces Together
For the finale, it’s time to connect all of these PVC pipes with secure glue. Although your pipes may feel like they already securely fit together without glue, they will easily pull and drag apart when you move the hose reel around your garden. Fortunately, you’ll likely not need to glue every part, so use your discretion.
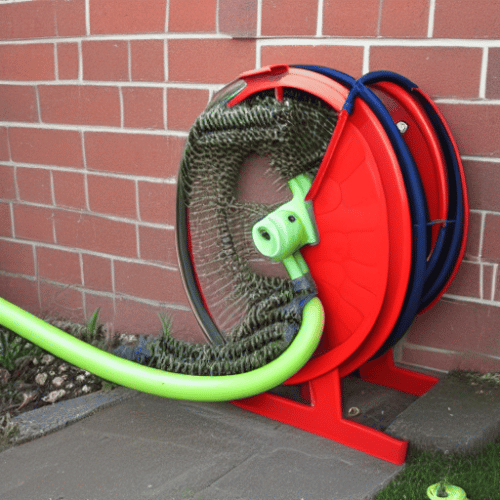
Used Tire Rim Reel
For our second DIY reel, you’ll need a used tire rim and if you happen to have a used one lying around that you no longer need—great! Otherwise, you can easily pick up an old tire from a scrapyard or garage to create a DIY garden hose reel in your backyard. This is probably the simplest garden hose reel to make from scratch and provides a decorative space to store your hose.
Step 1: Drill Bolts Into the Wall
Firstly, you’ll need to choose an appropriate space for your tire to mount onto the wall. Ideally, it’ll need to be within proximity of a hose. Only then can you drill bolts into the wall in the right direction for the tire rim to mount onto. Make sure to measure the tire rim’s dimensions because you want to have just the right amount of width once it’s mounted on the outside of your house.
Step 2: Attach the Tire
Once you’ve mounted the bolts to the wall, it’s time to place the tire rim onto the wall and securely attach it. Simply balancing the rim onto the bolts won’t be enough because it could fall off with a strong gust of wind or if someone accidentally knocks it. Therefore, we recommend bolting the rims to the wall. Then, put on your garden hose.
Garden Plant Box
You want your garden hose reel to be functional and practical while also looking attractive. Fortunately, a garden plant box provides an organised space for storing your hose reel when not in use while also acting as a designated space for additional gardening tools and hardware. Most impressively, this DIY project will make you proud to present your garden space to guests.
Step 1: Take an Outdoor Wooden Box
To make your life easier, take a pre-made wooden garden box rather than having to make a box from scratch completely. Ensure that it’s tall and wide enough to hold a garden hose reel inside.
Step 2: Cut a Hole
Cut a hole in the box to create an open space for your garden hose to sit inside when not in use. Make sure to consider your hose’s dimensions and not to have a stand that’s too small.
Step 3: Insert a Door
Using the piece of wood that you just cut out of the box, add screws to attach this back onto the box to form a hinged door. You may also need to add a handle or a lip to open and close the door with ease.
The Benefits of Making Your Own Hose Reel
A hose reel is a must-have if you regularly use a hose in your garden but don’t want to throw it on the ground after use. If you still need some convincing as to why it’s a great idea to make your own, below are some benefits of designing and making your own hose reel from scratch.
Saves Money
Making your own garden hose reel can help you save money. Instead of paying an exorbitant fee for an already-made hose reel, making one from scratch is much cheaper and easier than you think. Furthermore, you can even use any old furniture that you no longer use.
Get Creative
Best of all, designing your own hose reel allows you to personalise your garden equipment. So you can paint it the colour you love and choose a size that perfectly fits your hose. Have fun with the creative process, and allow your personality to sparkle.
Take Your Pick
With various designs to choose from, you can consider a simple solution. If you’re a skilled craftsman, create with two more advanced DIY hose reels.
Would you like to know how to make a garden hose reel? Do you have other ideas you’d love to share with our readers? Let us know your DIY favourites in the comments for a functional and attractive garden.
Amy is a U.K.-based writer and editor with a penchant for helping consumers find the best home products for their needs, as well as providing easily digestible guides for living better at home. Her dedication to her work means she can usually be found elbow-deep in research or hunting down samples of the latest and greatest on behalf of her readers.
An avid DIYer herself, Amy’s passion lies in teaching others how they too can achieve their dream homes by tackling some of those pesky projects themselves! Whether it’s building furniture from scratch or turning an old dresser into a coffee table, Amy is always happy to share what she knows about making your house feel like home without spending a fortune.