Last Updated on
At some point, the strimmer wire is going to come to an end. That’s when you need to be aware of how to replace the strimmer wire and how to do so effectively.
Fortunately, this is not the most difficult job to complete. Even replacing the wire on a double-line trimmer is not going to take too long.
Let’s Get Started
However, let’s examine the essential procedures you need to follow, whether you’re using a single-line trimmer or a double version.
Make sure you have switched off your strimmer. It’s all too easy to hit the switch and start things up, and then you will run into a whole host of problems. So, switch off, unplug, and then you know you are perfectly safe.
Replacing on a Single Line Version
First, let’s look at what you need to do with a single-line model.
Check the Spool Width
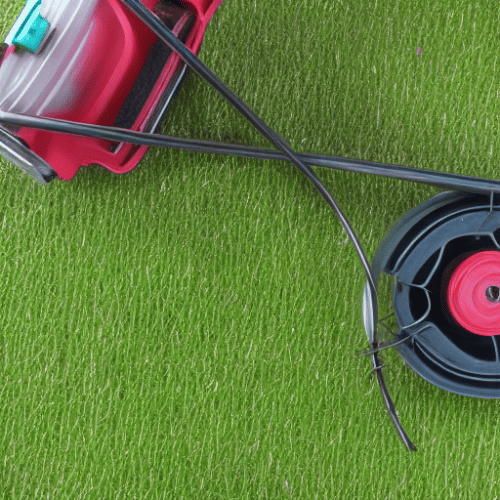
One of the first things you need to do with a single-line version is to check you have the correct amount of lines left for the model. Look at what’s already on your strimmer to make sure you don’t go and get the wrong width for your machine.
Getting the correct size strimmer line is important. If you don’t, then there’s every chance the trimmer head is not going to work.
Adding the New Line
To add a new trimmer line, you need to get into the strimmer head. Exactly how you get into the strimmer head will vary between models. Check your manual for added instructions regarding this.
The aim here is to get to the spool. It is done by either pressing down on a couple of arrows or unscrewing parts of the top to allow the retaining cap to pop off. Once again, you need to check your model to see exactly how it will all work.
Feeding the Line Through the Spool Hole
With most models, the spool sits in the core of the head, and the line has to come through a hole in the spool and out into the cutting area. Feed the trimmer line through this hole, but you then have to check something else before you start cutting.
Checking the Length of the Cutting Line
You want to make sure that the trimmer line is long enough to cover the entire strimmer head. If you come up short, you will be making life harder for yourself when cutting.
Once you see the length is perfect, it’s time to start setting up your strimmer so it’s ready for use.
Finding the Starter Hole
To get the strimmer to work correctly, you need to make sure the spool is correctly installed in the strimmer. It should clip down into place as long as you have the correct spool according to your model.
Once it’s sitting right in there, find the starter hole in the spool. There will be one starter hole in this instance, and you need to insert the trimmer line through this hole. It should slide easily through since the thread is the correct width.
Winding the Strimmer Around the Wire
Next, you need to wind the strimmer around the wire. Look for an arrow to offer some guidance to make sure you are going in the correct direction. Also, only go in one direction to prevent jams.
Make sure you place the wire in at least one eyelet. However, the number of eyelets will vary depending on the model and the actual trimmer head.
After that, check the trimming line goes through the starter holes, and also double-check the line remaining and that it’s going to be long enough to make a difference with the cutting part.
Finally, Attach the Cap
Once you have everything lined up, you need to attach the cap to the trimmer head. You are then good to go.
A Double Line Strimmer
Let’s quickly look at a double-line string trimmer and the best method for installing a replacement strimmer line.
Find the Best-Fitting Strimmer Line
Begin by finding the right strimmer line for your model. Having the correct reel makes a huge difference when using the correct replacing strimmer line methods.
Trim the Cord to the Correct Length
Take the reel, and trim the cord to the correct length, remembering you need to feed the cord through the strimmer head.
Next, find the spool in the strimmer head. Remember, you may need to push down on the reel to gain access to the cord. Check your manual for specific instructions about how to find the reel.
Once you expose the spool, replace it with your new one. Place the wire through the starter holes. Be aware that there may be two slots for the spool. Make sure the wire cannot wrap around and jam, so when you replace the string, get the lines positioned above the eyelets.
Make Sure You Go in One Direction
You still need to wrap the wire and follow what the arrows say next to the spool in the direction you should head in. Make sure the lines are as neat as you can get them. Have no snagging on the thread, or the reel will become a tangled mess.
Once you have the spool positioned, place the first length through the first hole. Follow that with the second line, and then double-check those straight rows once again.
The line end should cover the size of the trimmer head, just as it should with the single-line version. After you have checked over everything, replace the cover on the spool, and make sure the arrows align to stop the cover from coming off while in use, resulting in the spool potentially coming out.
Start Replacing Your Strimmer Wire
As you can see, changing this line should be easy as long as you have the right spool for your model. If you do have some difficulty threading the spool through the eyelets, then take your time, as you need this to be done correctly, or your strimmer may have difficulty working when you switch it on.
Once you know how to replace the strimmer wire correctly, we are confident your garden will look tip-top!
Paul is the type of person who never met a problem he couldn’t fix. He can always be found tinkering with something in his house, even if it isn’t broken! His tips and tricks are often shared on our site. He’s the one you call when something breaks because he has been known to improvise fixes for everything from leaky faucets to malfunctioning dryers.